Here's the finished piece, inspired by the other dresser, but uniquely my own. Love that! Who knows maybe mine will inspire you!
Showing posts with label Old White. Show all posts
Wednesday, May 21, 2014
Inspiration-Jump into Creativity
Here's the finished piece, inspired by the other dresser, but uniquely my own. Love that! Who knows maybe mine will inspire you!
Tuesday, October 15, 2013
Plain Vanilla... the French Provincial Buffet
So, it's been forever since I wrote a blog entry. I was busy with summer, vacations and life, I guess. But I did manage to get a few pieces painted for my daughters. Here's one of them.
This French Provincial buffet was quite a find at only $45. I was excited about painting it and began to dream of the possibilities when my teenage daughter decided to claim it as her own. She wanted to redo her room and use this one long piece to replace two pieces, an old dresser and a vanity. She really, really, really needed the extra storage for all of her clothes...and so it became hers.
Her room is painted with two walls in bright orange and the other two in magenta. I'm not sure how she gets any sleep in there, but it certainly is bright and cheerful. We were to be placing this piece on the orange wall. When I asked her what color she wanted, her answer was white. My dreams of a two toned piece that played up all of the interesting details were dashed. Plain vanilla it is! We decided to go for a high contrast look, by painting the hardware in oil rubbed bronze. It is missing one pull, so I'm working on finding a suitable replacement.
It's a classic and it looks just right against her orange wall with
all of her colorful artwork. There is plenty of room to hold all of her
clothes! So now I find myself wondering why are there still so many clothes on
the floor?
Thursday, May 9, 2013
Plan B
Well, what to do? I know! That great new color I just bought, Florence! So I was "off to the races," again!
I decided to distress this table. I just love the juxtaposition of the clean, more modern lines of the table, with the well-worn look that the distressing suggests...as though this table has been around forever. I think that makes it a very interesting piece.
Surprise! Turns out that my little "mistake" added another layer of color and dimension to the finished look. I love that! Well, maybe Plan B isn't so bad after all!
Of course, this table would be great as a sofa table or a foyer table with a couple of lamps and some favorite treasures.
But I thought the tray- top of this piece, made it perfect as a serving piece. Here, I have set it up as a 'bar" for serving wine. This table is simple and lightweight, which also makes it very versatile. It can be moved around and used for any number of purposes.
Tip: When having guests over for an event, consider rearranging your furniture for better seating and conversation. Repurpose pieces, like this table, to serve a new function. This could be a wine, an appetizer or a dessert station. Pull up a couple of chairs and it could even serve as extra table seating, in a pinch.
That's what creativity is all about. There is always more than one way to do something. Think outside of the box! Use your stuff in new ways! Move it around! Don't be too stiff! Be flexible! That's what I had to do with this design. This is also true of life in general. Sometimes you just have to shake things up! Sometimes Plan B offers something even more interesting, exciting and unexpected!
Monday, April 1, 2013
Striking Stripes
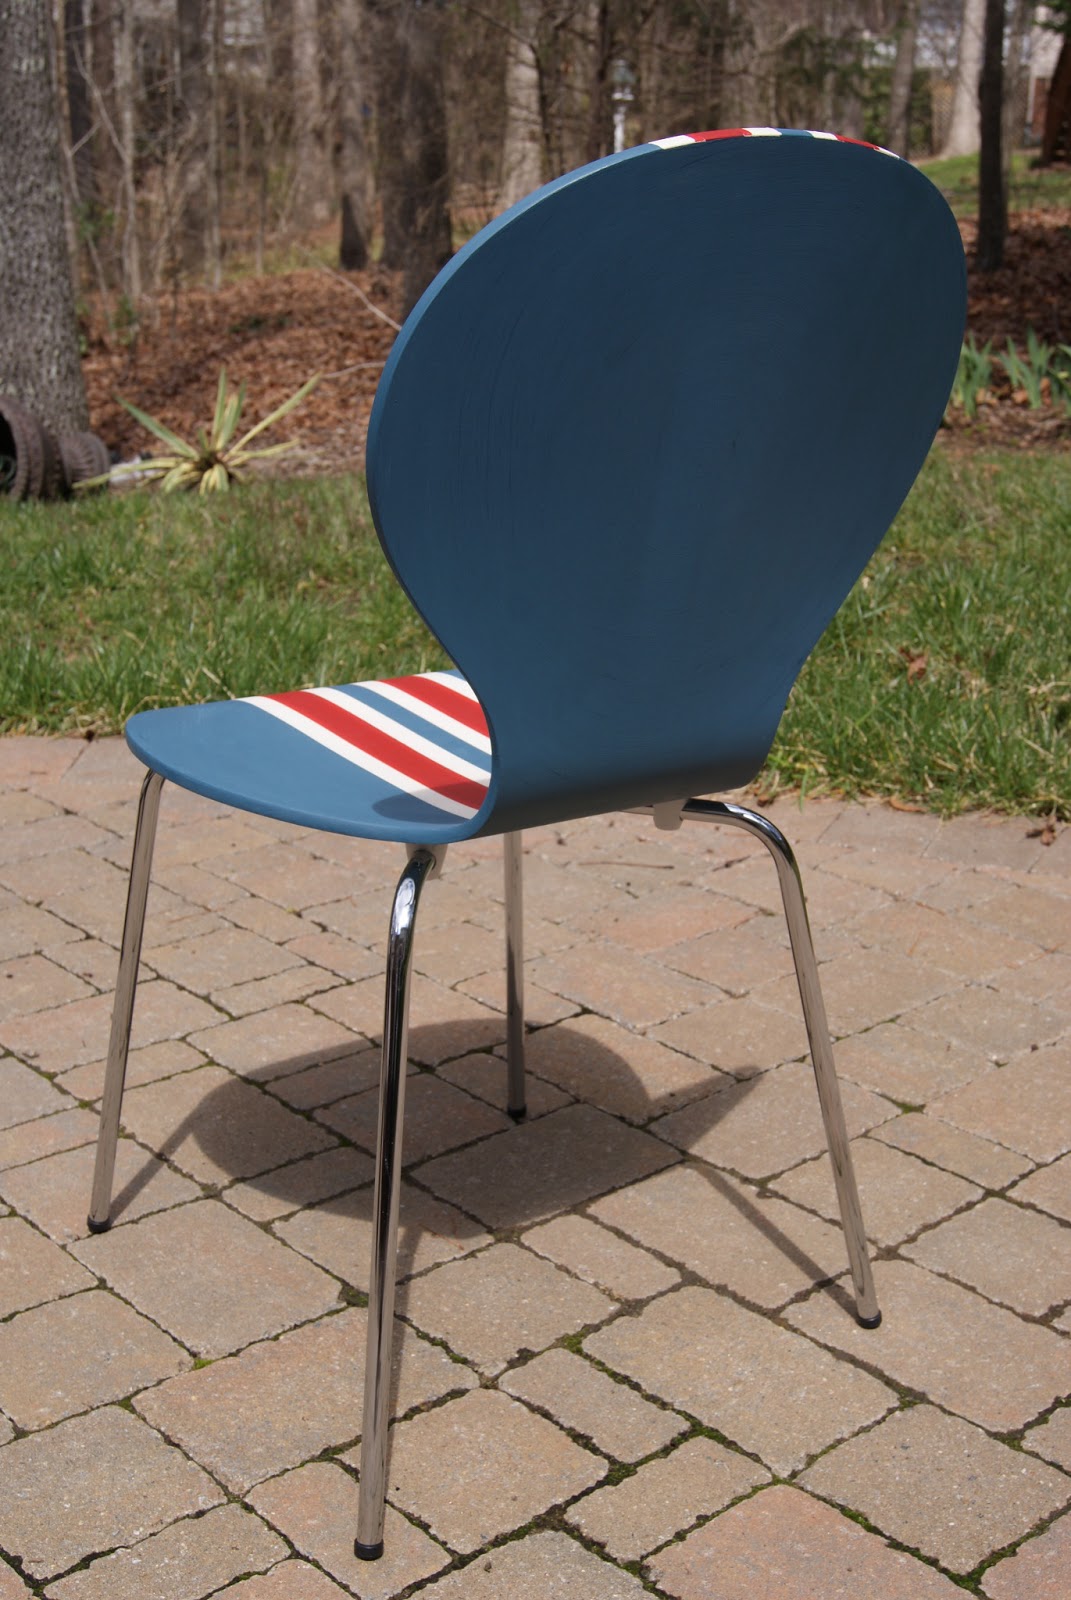
These adorable blue chairs caught my eye at a thrift store. They were a lovely shade of blue, but they had a few little nicks in the paint. Inspired by a chest I saw on a blog, with a Union Jack flag painted across the front, I decided to paint these with a striking "patriotic" stripe. For the blue, I custom mixed a blue shade. Then added ASCP in Old White and Emperor's Silk.
The blue paint was applied first in a circular motion to accentuate the shape of the chairs. I did that on both the front and the back of the chairs. I allowed some of the original blue paint to show through, adding a little texture and dimension.
Then I used 1 inch blue painter's tape to create stripes down the center of the chairs. First, I centered one piece of tape down the length of the chair. I did this by measuring and marking the center of the chair with a piece of chalk and then lining up the tape so that it was perfectly centered. Then I put four additional pieces of tape on either side of the center piece of tape being sure to align the edges of tape without overlapping. It is crucial to place the first piece of tape correctly, or else it will all turn out crooked.
When I was finished I had a total of nine pieces of tape. Next, I removed the tape on either side of the center piece, as well as the second to last piece on each end. I painted these areas with the white paint. Once this was dry, I replaced the tape over the white parts and then pulled the tape between them off. I painted these areas red. I then removed all of the tape, revealing equal 1 inch stripes of red, white and blue (which was the original color beneath the tape).
After seeing the result, I decided that I would prefer that the red stripe was wider, so I went back in and expanded the red stripe by once again taping off the area that I planned to paint. Had I planned that from the start, I could have used two pieces of tape together to create a 2 inch stripe of red. But all's well that ends well. Sometimes you just have to experiment a little.
I decided to stripe only the front of the chairs and left the back sides blue, with the circular paint effect. They would look great in a boy's room or as accent pieces anyplace that could use a little drama.
Monday, February 4, 2013
Storage Can Be Beautiful!
Author's Note: I wrote this new post for January, but then my camera broke, leaving me without the pictures I need to accompany the piece. So here it is finally!
Welcome to 2013! Can you believe it? Time seems to be flying by faster than ever! This time of year is one of reflection as well as looking forward to the year to come. While I have been involved in home decorating for some time now, this past year brought a new passion for painting furniture and home decor. It has been a joy! I love the pure creativity of first finding the inspirational piece, then imagining it's new form in color and design, and then the act of creating it and seeing it come to life. I feel like a kid with a blank sheet of paper in front of me...all of the possibilities! I want to express my gratitude to all who have encouraged me and supported me this past year. Thanks again to those who allowed me to work on a custom piece for you, or purchased one of my creations at the flea market or through Craigslist! It's been a blessing to meet and work with each of you!
As I look forward, I find myself making "to do" lists in my head. They are not only for the day or the week, but for the whole year. I think most of us feel a strong desire to finish projects or start new ones and to get organized. An organized space allows us to replace chaos with a sense of peace, and who couldn't use more of that? These days there are a plethora of products, magazines and blogs out there that encourage us to not only create organized spaces, but to do it beautifully. There are all sorts of containers to hold your STUFF, be it office supplies, toys, books, gadgets or clothes. Which you choose for your home is up to you. Will it be a bright green box or an earthy woven basket? Will it be covered in a lovely printed fabric or made of something organic like sea grass? The details are what make your home uniquely yours.
Storage can be beautiful! In keeping with that theme, I decided to paint this great old dresser in two tones, Old White and Coco.
I then added a Moroccan stencil detail incorporating the drawer knobs into the design. I used a little dark wax to accentuate the details of the carved wood.
That's not all! I painted the insides of the drawers in Provence and stenciled them too, so that when you put your clothes away, you are rewarded with a little surprise for your eyes only.
You have to put your stuff somewhere, right? It might as well be beautiful! Then being organized might not feel like such a chore. Okay, I'm not buying that either, but if you would like to put your clothes in this dresser, send me an email, it's for sale. Happy New Year and happy organizing!
Welcome to 2013! Can you believe it? Time seems to be flying by faster than ever! This time of year is one of reflection as well as looking forward to the year to come. While I have been involved in home decorating for some time now, this past year brought a new passion for painting furniture and home decor. It has been a joy! I love the pure creativity of first finding the inspirational piece, then imagining it's new form in color and design, and then the act of creating it and seeing it come to life. I feel like a kid with a blank sheet of paper in front of me...all of the possibilities! I want to express my gratitude to all who have encouraged me and supported me this past year. Thanks again to those who allowed me to work on a custom piece for you, or purchased one of my creations at the flea market or through Craigslist! It's been a blessing to meet and work with each of you!
As I look forward, I find myself making "to do" lists in my head. They are not only for the day or the week, but for the whole year. I think most of us feel a strong desire to finish projects or start new ones and to get organized. An organized space allows us to replace chaos with a sense of peace, and who couldn't use more of that? These days there are a plethora of products, magazines and blogs out there that encourage us to not only create organized spaces, but to do it beautifully. There are all sorts of containers to hold your STUFF, be it office supplies, toys, books, gadgets or clothes. Which you choose for your home is up to you. Will it be a bright green box or an earthy woven basket? Will it be covered in a lovely printed fabric or made of something organic like sea grass? The details are what make your home uniquely yours.
That's not all! I painted the insides of the drawers in Provence and stenciled them too, so that when you put your clothes away, you are rewarded with a little surprise for your eyes only.
You have to put your stuff somewhere, right? It might as well be beautiful! Then being organized might not feel like such a chore. Okay, I'm not buying that either, but if you would like to put your clothes in this dresser, send me an email, it's for sale. Happy New Year and happy organizing!
Sunday, June 10, 2012
From Formal to Dressy Casual
Back in the day, when I was growing up, people used to have a "formal" living room. You know the room I'm talking about. The one that you could only peak at from the hallway, but were never allowed to enter. The one that was beautifully decorated and reserved for some "special occasion" that never seemed to come. It stood as some sort of monument or tribute to a way of life reserved for the fancy and sophisticated, which apparently did not include you or your brothers and sisters. In fact, the room was rarely used in entertaining, leaving one to wonder "Who is fancy enough for this place?" These rooms were often furnished with Queen Anne style tables sporting elegant curved legs and a dark cherry finish, often a piano, and the finest of china and nick-knacks.
| The "before" tables (that's a layer of primer on top of the coffee table) |
| The "after" |
Many of us grew up to either create our own "tribute to fancy people" using this furniture, or we inherited these pieces from our family. When I had an opportunity to redo a set of Queen Anne tables recently, I couldn't wait to get my hands on them and "dress them down." Our lives today are far more informal than years ago. Formal attire once worn to the office, church and the theater has been replaced with "dressy casual" attire in an effort to make us all feel more comfortable. And that is the way we choose to live, too. The formal living room has been replaced by the "family great room," where you are encouraged to relax and get comfortable.
I layered the tops in a Coco and Graphite wash that gave them "character" and then distressed them too, to show the cherry wood underneath at the edges. The hardware, once shiny and gold, was repainted to an oil rubbed bronze.
Wednesday, February 22, 2012
Plain Jane Pines for a New Look
Labels:
Annie Sloan Chalk Paint,
end table,
estate sale,
gray,
Old White,
Paris Grey,
stencil
Location:
Cary, NC, USA
Subscribe to:
Posts (Atom)